Friday, September 26, 2008

My First Free Complete Kit

Hi everyone,
I know long time no post, but you know how "Real Life" is.

This is my new Freebie - My first complete - Kit "Autumn Glory".

Inspired by using the September Color Swatch Challenge from KimB at DSO.


This is a for "Personal Use" Only Kit!


Not All Elements are shown in the Preview!


It includes:

14 papers
1 Rusty Alpha Uppercase only
5 bows
5 Glass Brads
5 Buttons
4 Frames
5 colored Lace Doilies
5 Puffed Felt Leaves
5 Paper Clips
5 Torn and Crumpled Tags
5 Binder Clamps in PSD format


Credit for the Puffed Felt Action is going to Atomic Cupcake.
Credit for the Crumple And Torn Tag Script is going to Jennie - Triplemom


Enjoy!

Linda aka MadLin

My TOU and the Credits for the Action\Script writers are included in the files.

Under no circumstances are any of my designs to be forwarded through any internet groups, separately or as a whole.
They are not to be uploaded to any hosting site.
Please no direct linking to 4Shared.
That is stealing.
Send your friends and groups to my blog instead.


Papers

Elements

Alpha


Download links expired.

Saturday, August 9, 2008


Mason Jar


Written by Linda aka MadLinDesigns on June 9, 2008.
© MadLinDesigns
This Tutorial was written from my own ideas any resemblance to other tutorials
is purely coincidental.
You may use this tutorial for personal use only. Do not Distribute in other groups,
post on a website or send in email without express permission of me.
.

Please DO NOT script my tutorial.


------------------------------------------------------------------------------


Supplies Needed

Paint Shop Pro – I used PSPX but with slight alterations
the same results could probably be achieved in other
versions.
You can download a demo of the latest version here

A tube of your choice to fill your jar or download mine here
A gradient for the lid, you may download mine here

--------------------------------------------------------------------------------

Notes:

All settings remain the same unless otherwise stated
This Tutorial assumes you have a working knowledge of PSP

OK…got everything, are you ready? Then let's get started!
Please be sure to save often as a psp file, doing this ensures that if your
Computer crashes or PSP freezes you won’t have to start from scratch.


1.

Open a new transparent image with the dimensions 600x600 pixel
Resolution 300 dpi
File – New – ( Ctrl+N )


This gives us enough room to work with, we can crop later

2.

In your Materials Palette close the foreground Color
And choose white for your background Color

Select your preset tool (P)
Rounded Rectangle – Anti Alias Checked – Create as Vector checked
Solid line style – width 8,00


These are my settings and are only a guide, please feel free to experiment
with your own settings


3.

From x100 y200
(the size is your choice)
To x385 y 585
draw a rectangle
Objects - Align – Horiz.Center in Canvas
Convert to Raster layer
Layers – Convert to Raster Layer


4.

Still using the preset shape tool, rounded rectangle
Draw another rectangle, a little bit smaller in width
and height,
Objects – Align – Horiz.Center in Canvas
Convert to Raster layer
Layers – Convert to Raster Layer


5.


Move into position so that it looks something like this
I have filled my bottom layer with a light grey
This makes it easier for you to see what it is supposed to look like


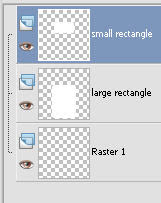
You should have 3 layers
the bottom layer, which should be empty
the middle layer with your larger rectangle
and the top layer with your smaller rectangle
6.

Close the bottom layer
Layers – Merge – Merge Visible

Selections – Select all – Float – Defloat
Layers – New Raster Layer
Effects – 3D Effects – Cutout


Layers – New Raster Layer
Repeat the Cutout with Horizontal –21 (minus)
Deselect
Selections - Select None


7.

On your large rectangle layer, lower the opacity to about 45
Again these settings are only a guide
Feel free to experiment with your own settings


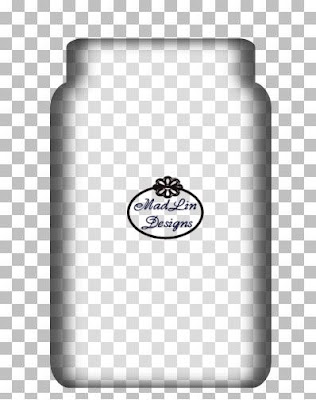
Layers – Merge – Merge Visible
We now should have something looking like this


8.

Select your preset tool (P)
Rounded Rectangle – Anti Alias Checked – Create as Vector checked
Solid line style – width 8,00

Draw a rectangle, about the same width
As your jar, when you are pleased with the size
Objects - Align – Horiz.Center in Canvas
Convert to Raster layer
Layers – Convert to Raster Layer


9.

Move your rectangle a little up so that it looks like the
Cap is sitting tightly on your Jar and a little of the jar neck
Is showing, like this


Selections – Select All - Float - Defloat

In the materials Palette change your foreground color
To a gradient of your choice,
(remembering if you want to save as a template to choose a gradient
that you can colorize easily.)
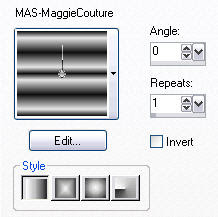


With your flood fill tool, fill selection.
Do not Deselect

10.

Layers – New Raster Layer
Effects – 3D Effects – Cutout
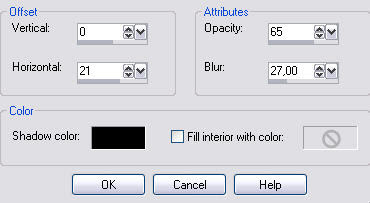


Layers – New Raster Layer
Repeat the Cutout with Horizontal –21 (minus)
Deselect
Selections - Select None

11.


Adding a reflection or highlight on your Jar.

Activate your jar layer, this is the second layer
Layers – New Raster Layer
With the selection tool, rounded rectangle


Draw a selection, on the left side of the jar about 80 width and 375 height
Flood fill with white, select none
Selections – Select None


12.

Adjust – Blur – Gaussian Blur


move a little more over to the left.
And in the layer palette lower the opacity to about 80


13.

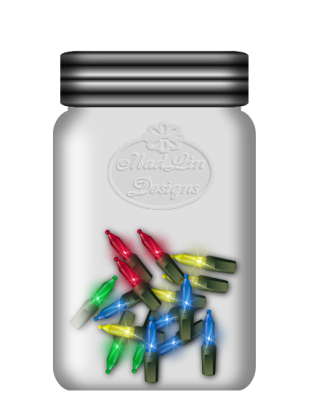
That’s it, you’ve made your first mason jar and now
Should have something looking like this
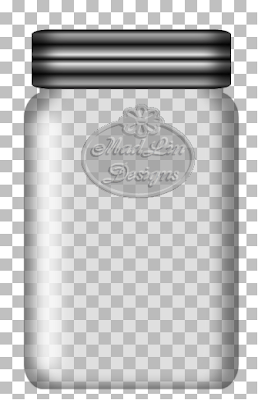


To preserve the layers save as a PSD file,
Save as and choose PSD from the dropdown menu
Using this method enables all programs to open and use the files.
Some designers prefer the PNG file option to save
But here you have to save each layer separately and they cannot
be opened by all programs.

Use the following settings if saving as a PNG file

File export – PNG Optimizer
Colors:
check 16,7 million Colors (24bit)
Transparency:
Check Alpha Channel Transparency
Existing image or layer transparency
Leave the other tabs alone.
Click ok, name it and save in a folder of your choice

----------------------------------------------------------------------------------

Thanks for trying my Tutorial,
I hope you have enjoyed creating this with me.


If you have any comments or questions, please email me here.


-----------------------------------------------------------------------------------


Filling your Mason Jar:

To fill your finished jar, duplicate the jar layer
Layers – Duplicate
Highlight the bottom Jar layer
Layers – New Raster Layer
(This layer should be between the two jar layers)
You can then fill with whatever you please
I also lowered the opacity of my jar layers and
Set the blend mode to soft light, but this
Is just a personal touch.
Merge visible if wished


Copyright © 2008
Linda aka MadLin - MadLinDesigns
All Rights Reserved

Grey Scale Flowers and Seperate Centers

Hi everyone,
it's Saturday today and i forgot to post a Freebie on Wednesday.
So i thought i would treat you all to a couple of Greyscale Flowers with
extra centers.


You can colorize them to any color you need, this way if you need
a little something to make your layout complete you don't have to
worry about the colors matching.

As usual they are for Personal use only, please respect my TOU, which
is included in the download.

Under no circumstances are any of my designs to be forwarded through any internet groups, separately or as a whole. They are not to be uploaded to any hosting site. Please no direct linking to 4Shared. That is stealing. Send your friends and groups to my blog instead.

If you download, please don't forget to leave me a little comment.
I read them all and really appreciate you taking the time to let me know
that you like the items i make.

Download link expired.

Wednesday, July 30, 2008

Flowers Freebie

Well, it's Wednesday again and guess what........
Yeah, i have another freebie for you all. It's just a little mini-kit, so i hope you all like it.


I would love to see what you make from it.
Just leave me a link for your blog.

Under no circumstances are any of my designs to be forwarded through any internet groups, separately or as a whole. They are not to be uploaded to any hosting site. Please no direct linking to 4Shared. That is stealing. Send your friends and groups to my blog instead.

I Love to read your comments and hope you will leave me a little love.

Download link expired.

Wednesday, July 23, 2008


Well finally i have something to show and share. I know it took me a long time but i have to get used to the fact that i can now share my creations with you all.
Today i have a Bead Alpha freebie for you. I hope you enjoy using it as much as i enjoyed making it.

Under no circumstances are any of my designs to be forwarded through any internet groups, separately or as a whole. They are not to be uploaded to any hosting site. Please no direct linking to 4Shared. That is stealing. Send your friends and groups to my blog instead.
Available until the 30th July.

Please leave me a comment if you download, i would really appreciate it.
Thanks.

Download link expired.

Saturday, July 12, 2008

I finally made it!

Yeah, i now belong to the Bloggosphere!!!

Thanks to my daughter Melly for helping me and and a big thanks to
Kristine from WenchdGrafix Designs for inviting me to participate in
the Mega Blog Scrap Party.
These girls rock!!!
I was forced to have a Blog, so now i have to get used to it

Impressum und Rechtliches

Impressum--Datenschutzerklärung -Verlinkte Inhalte

Impressum laut Teledienstegesetz §6:

L.M.


E-mail:madlindesigns@gmail.com

Datenschutzerklärung:

Ich, L. M., Verfasserin des "MadLinDesigns Digital Scrapbooking and More" nehme den Schutz Ihrer persönlichen Daten sehr ernst und halte mich an die Regeln der Datenschutzgesetze.
Die nachfolgende Erklärung gibt Ihnen einen Überblick darüber, welche Art von Daten zu welchem Zweck erhoben werden und in welchem Umfang diese Daten Dritten zugänglich gemacht werden.

Datenverarbeitung auf MadLinDesigns Digital Scrapbooking and More

In den unvermeidlichen Serverstatistiken werden automatisch solche Daten gespeichert, die Ihr Browser an uns übermittelt.

Dies sind:
-Browsertyp/ -version-verwendetes Betriebssystem-Referrer URL (die zuvor besuchte Seite)
-Hostname des zugreifenden Rechners (IP Adresse)
-Uhrzeit der Serveranfrage.
Diese Daten sind für mich in der Regel nicht bestimmten Personen zuordenbar.
Eine Zusammenführung dieser Daten mit anderen Datenquellen wird nicht vorgenommen, die Daten werden zudem nach einer statistischen Auswertung gelöscht.

Cookies

Das MadLinDesigns Digital Scrapbooking and More -Blog verwendet keine Cookies.
Sorgen hier sind also unbegründet.

Kommentare, Emails

Selbstverständlich erfassen und speichere ich solche Informationen, die Sie auf dem MadLinDesigns Digital Scrapbooking and More -Blog eingeben oder mir in sonstiger Weise übermitteln.
Das betrifft etwa Kommentare, Namen, Email-Adressen und ULRs, die Sie in die entsprechenden Kommentarfelder eintragen.
Diese Angaben geschehen freiwillig und werden in keiner Weise überprüft, die Verwendung von Pseudonymen etc. ist möglich.
Wir weisen darauf hin, dass Name, angegebene Webseite und Kommentare für jeden Benutzer der Seite einzusehen sind.
Daten werden auch erfasst und gespeichert, wenn Sie Emails an mich senden.

Auskunftsrecht

Ich würde Ihnen gern Auskunft über die bei blogger gespeicherten persönlichen Daten geben.
Ich weiß allerdings nicht mehr, als Sie auch.
Dieses wenige Wissen teile ich im Rahmen der gesetzlichen Auskunftsansprüche allerdings gern nochmals mit Ihnen.
Wenn Sie weitere Fragen zur Behandlung Ihrer Daten haben, dann senden Sie einfach eine Mail an meine Adresse - die finden Sie oben im Impressum.

Distanzierung von verlinkten Inhalten:

Das Landgericht Hamburg hat mit einem Urteil vom 12. Mai 1998 entschieden, dass man durch die Anbringung eines Links die Inhalte der gelinkten Seite gegebenenfallsmit zu verantworten hat, wenn man sich nicht ausdrücklich von den Inhalten der verlinkten Seite distanziert.
Das MadLinDesigns Digital Scrapbooking and More - Blog bietet auch Links zu anderen Seiten im Internet.
Für alle auf den Seiten des MadLinDesigns Digital Scrapbooking and More - Blog verwendeten Links gilt:

- Ich habe keinerlei Einfluss auf die Gestaltung und die Inhalte dieser Seiten.
- Ich überwache keine Links auf Korrektheit und Beständigkeit.
- Ich distanzieren mich von den auf den verlinkten Seiten dargestellten Inhalten, ich machen mir die Inhalte nicht zu eigen.
- Es gelten die Copyrightbedingungen auf der verlinkten Seite.Diese Erklärung gilt für alle auf unseren Seiten angebrachten Links und für alle Werbeseiteund Werbebanner.Ich behalte mir vor, Links zu Seiten mit illegalen Inhalten umgehend zuentfernen, sobald ich davon Kenntnis erhalte.
Ich behalte mir weiterhin vor, Seiten mit illegalen Inhalten strafrechtlich anzuzeigen